
This release is about the setup you repeat on every project. Strucit now remembers how you work: the materials, power levels and cable you use most, how your devices get their power, and what kind of cable each run is. All three change what lands in the report, so the numbers you hand a client match the job you are quoting.
Defaults every project starts from
The profile window has a new Defaults page. What you set there is where every new project and tool starts:
- Units: metric or imperial.
- Wall materials: one for interior walls and one for exterior walls, used by the wall tool and the Add rooms dialog.
- Access points: transmit power and band.
- Conduits: sized automatically per part, or always one size.
- Cable type: the cable every new cable starts as (more below).
- Rooms grid: the size of the grid the Add rooms dialog opens with.
- Materials extra (Pro): the percentage added to every measured length and count in the reports, 30% unless you change it.
A pick in a tool’s toolbar doesn’t change your defaults, so trying a different wall in one project doesn’t change the next. Each field can be reset, to fall back to the organization’s value or the app’s.
Organizations get the same page. Admins set the organization’s defaults, and members with a seat start from them, with their own settings on top. A project in the organization’s folders follows that organization. The tray and conduit Material rules (fill shares, diameters, spacings) are a page of the same window, for you and for your organization (Pro).
A project keeps the calculation defaults it was first saved with, so changing your profile later doesn’t move the numbers of a quote already sent, and a share link shows the figures you worked with.
There is also a Saving projects page: choose whether Save (and Ctrl+S) saves to the cloud or downloads the project file, and pick a default folder so a new project’s first cloud save goes straight into it.
PoE from the device menu
Before, Strucit knew a device was powered over Ethernet only if you wrote “PoE” in its specs. Now access points, cameras, smart locks, alarms, IP phones, printers, speakers and switches have a PoE switch in their menu, and it works on several selected devices at once.
- A switch set to PoE powers what is cabled to it: access points, cameras, smart locks, alarms and IP phones. Printers and speakers only take PoE from their own setting, since most of them are mains-powered.
- Power points follow: a device powered over Ethernet gets no outlet in the report.
- Mismatches are flagged: a device set to PoE whose switch isn’t PoE is marked on the plan, and its menu says how to fix it.
- The switch suggestion follows too: a switch powering PoE devices is suggested with PoE.
- A new IP phone device joins the library.
In the reports, every device’s specs say where its PoE comes from (set in the menu, from its switch, or a PoE switch), in the text report and the PDF. The PDF’s Wi-Fi section now ends with a list of the access points, with their specs, transmit power and band. The PoE power budget is not checked yet.
Cable types that drive the numbers
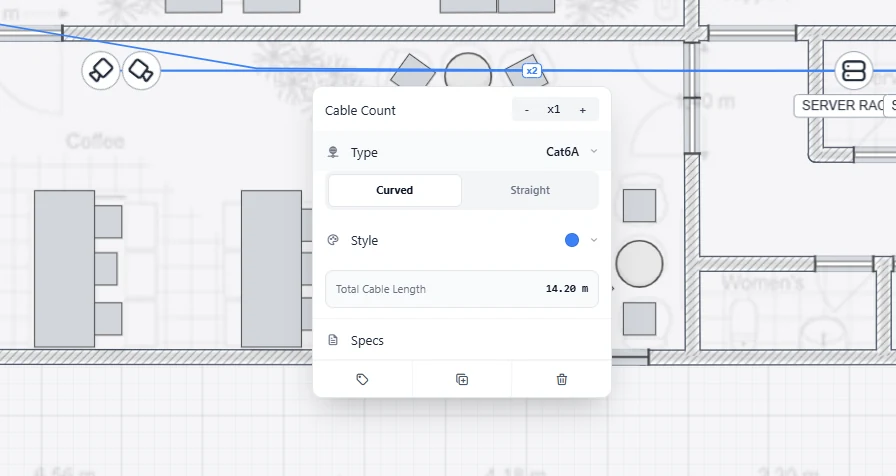
Cables used to take only free-text specs. Now the cable tool has a toolbar with a list: Cat5e, Cat6, Cat6A, and fibre OM3, OM4 and OS2. Pick one and every cable you draw after it gets that type, Autoconnect’s included. Cables already on the plan keep theirs, so a fibre backbone and Cat6 to the outlets can share a plan. To change a cable, select it and pick a type in its menu; any notes in its specs stay.
The type is not just a label. It sets the cable’s diameter, which sizes the conduits it runs through: a conduit holds about half as many Cat6A as Cat5e. It decides which runs get the 90 m copper length warning, which fibre doesn’t. And it is written into each cable’s specs, so the equipment list names it, ready for the quote. Set your usual cable on the Defaults page and every new project starts with it. The details are on the cable trays and conduits and cabling and switch report pages.
Also in this release
- The projects window has two panes, like the account window: folders on the left, their projects on the right.
- The organization window follows the account window’s layout, with its pages in a left menu.
- The Add rooms dialog keeps the order you drew the blocks in on the grid, fits large grids without scrolling, and remembers the wall materials you pick.
Tell us what’s missing
The defaults, PoE and cable types are free; the materials extra, your own material rules, organizations, cloud save and the PDF are Pro. If a default you set on every project is still missing, write to [email protected].