Strucit draws each camera’s field of view on the floor plan and cuts it off where a wall blocks the view, so blind spots show up on the plan instead of on the first day of recording.
How it works
- Draw or detect the floor plan. Walls are what cut the cones, so they need to be there.
- Place cameras from the device library.
- Aim them. Rotate the camera icon; the cone follows.
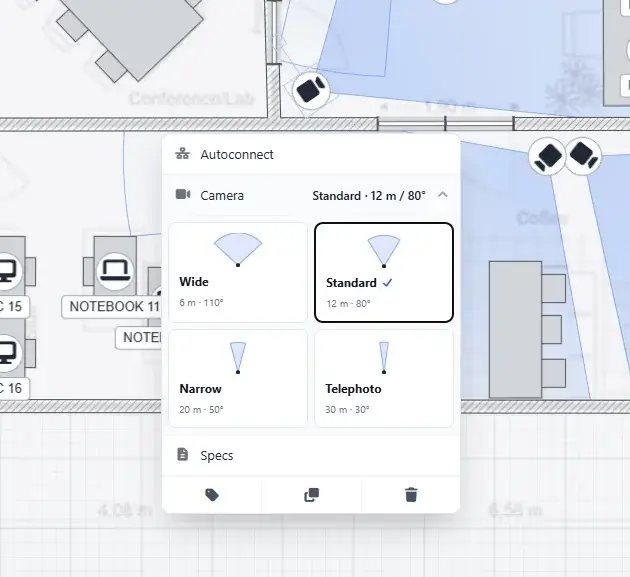
- Pick a coverage preset per camera: range and angle change together.
- Turn on the Camera Coverage layer to see every cone at once. Overlapping cones read darker, so double coverage is easy to spot.
Presets
| Preset | Field of view | Range | Ideal for |
|---|---|---|---|
| Wide | 110° | 6 m | Reception desks or small rooms from a corner |
| Standard | 80° | 12 m | Open offices, shop floors, general indoor coverage |
| Narrow | 50° | 20 m | Corridors, long aisles, entrances seen from a distance |
| Telephoto | 30° | 30 m | Parking lots, driveways, gates and fence lines |
The preset you pick becomes the default for the next camera you place.
Walls, doors and windows
Cameras see in straight lines. Strucit casts the view out from each camera: a solid wall stops it, and a door or window lets it through. There’s no “bending” around corners like Wi-Fi signal. What the cone shows is what has a line of sight to the camera.
Free and Pro
Placing cameras, cabling them and listing them in the report are free. The coverage cones and the camera map in the PDF export are Pro.
What it doesn’t do
- No lens or sensor model: no focal length, resolution or DORI distances. One range and one angle per camera.
- Floor plan only: camera height, tilt and vertical field of view aren’t modeled.
- Furniture and shelving don’t block the view; only walls and columns do.